Saturday, December 11, 2010

Adding a Date Range Filter to a Master Table with the dataTables jQuery Plugin

This past week I was asked to build a simple suggestion box web app.  The people responsible for reviewing the suggestions wanted to be able to filter the suggestions by keyword and by date range.

Having used the dataTables jQuery plugin in previous projects, I knew that it could take care of the keyword filtering requirement, but I had never used it to filter out rows that didn't fall into a date range.

I did some research and found enough information to get it working, but since I didn't come across any single crystal-clear example or demo for it, I figured I'd throw one together to illustrate it.  You can check the source code to see what's going on under the hood. I also used the jQuery UI Datepicker plugin to make the date range boxes more user-friendly.  Here's the URL:

https://bcswartz.github.io/jQuery-dataTables-dateRange-demo/

Sunday, November 28, 2010

Technique For Managing Form Input in Model-Glue

I've been meaning to post about this technique I'm using in some of my Model-Glue applications, but I couldn't decide on the best way to explain what led me to develop it.  So I'm going to start with the code first rather than the explanation:


This collectFormDataAndTrim function lives in my main controller CFC in my Model-Glue appplications. I call it via a message broadcast any time I need to process typical form input.

Like many of the ColdFusion application frameworks, Model-Glue takes both the URL variables and any values submitted by an HTML form and puts them into one data structure for easy retrieval.  In the case of Model-Glue, that data structure is the event object. My function supports two different methods for retrieving the form values from the Model-Glue event object: it can use the list of form field names contained in the "fieldnames" variable created by ColdFusion, or it can process the event variables named in an argument called "propertyList" submitted in the message broadcast, like so...

<broadcasts>
    <message name="collectFormDataAndTrim">
        <argument name="propertyList" value="firstName,lastName,email,acceptTerms" />
    </message>
...


Two reasons for the propertyList option: specifying the form fields you expect to get prevents you from processing extra form fields a malevolent user might add to the form via JavaScript or some other means, and it allows you to name checkbox fields which would not be included in the formfields list if the user doesn't check them.

Once the form fields names are copied into the local propertyList variable, the function loops through the form variables, sanitizes them for further processing using Trim() and HTMLEditFormat(), and adds them to the loc.form struct variable.  I also submit the non-numeric form values to the removeMSWordChars function in my miscService bean to replace any Microsoft Word characters within the content with web-friendly equivalent values (my users have an annoying habit of copying and pasting text from Word into longer text fields).

Finally, the loc.form struct variable containing the santized form submissions is saved back into the Model-Glue event object to be utilized by subsequent message broadcasts (for the functions that will validate the form data and save it to the database).

Wednesday, September 1, 2010

Custom jQuery Validate Rule For Making Sure One Date is Later Than Another

In addition to providing a number of standard validation rules, the jQuery Validation plugin also allows you to create your own validation rules via the addMethod() function.  Today I had a situation where I had to use that function:  I had to create a rule to ensure that the end date of a date range determined by the user was later than the starting date.  I thought I'd share what I came up with.

The details of the situation:

  • The user set the starting date using two radio buttons and a text field bound to the jQuery UI Datepicker.  Selecting the first radio button meant that the start date (the "now" button) should be set to the current date, while selecting the second radio button (the "later" button) meant that the starting date would be determined by the value in the Datepicker field.
  • The user set the ending date using another Datepicker-bound text field.
  • The Datepicker plugin ensures that the date is always in the format "mm/dd/yyyy".

Here is the code:


So if the user selected the second start date option and chose a date using the Datepicker widget, the code splits up the date string into an array and uses the individual month, day, and year values to create a Date object. If the user selects the option of making today the starting date, a new Date object is created (which by default has the value of the current date and time) and the code creates a new Date object with the same date but with the time-specific data stripped out (because the end date will not have a time value attached to it).

The Date object for the end date is created with the same technique used for the second start date option, and then the getTime() function is used on both the start and end Date objects to get the number of milliseconds between each date and January 1, 1970 (a starting point for date and time values used in both JavaScript and Java). Then it does the comparison between the two dates.

It's then a simple matter of applying this custom method somewhere within the normal jQuery Validation rules block:

...
rules: {
    endDate: {
      required: true,
      dateComparison: true
    }
...

Tuesday, June 29, 2010

Quick Tip: Use jQuery live() Function For Links in JavaScript-Powered Data Tables

NOT doing the tip that I'm about to share has bitten me twice now, so I'm putting this out there as a reminder to myself as well.

The jQuery live() function is an extremely useful function to have when you're adding or removing page elements that have jQuery event handlers assigned to them because using live() ensures that any new element that matches the live() selector gets that event handler automatically.

It's easy to remember to use live() when you're writing your own code that adds and removes DOM elements, but when you're using a plugin that does the adding and removing behind the scenes, you might not think about it.  In one of my applications, I apply the jQuery DataTables plugin to my HTML tables so that the users can sort and filter the data in the tables.  Included in each row are hyperlinks that trigger certain actions via JavaScript/jQuery. 

When I originally assigned the event handlers to these links, I simply used the "click" event handler on them.  The links worked perfectly if they were displayed as part of the initial page load, but any links belonging to rows that appeared later (as the result of a sort, filter, or pagination event in the plugin) did not work because the link elements were actually added by the plugin, and hence did not have the event handlers assigned to them.

In short, if you're using one of the many plugins to enhance HTML tables, and you have elements in each row that have jQuery events assigned to them, make sure you use the live() function to assign those event handlers.

Monday, June 28, 2010

My First Published Android App: NoteToSelf

I haven't been blogging much lately, but that's partly because I was on vacation for a week and partly because I was working on this:

https://play.google.com/store/apps/details?id=org.swartzfager.NoteToSelf

It's a fairly simple app built with the standard Android API, but it meets MY need for a note/reminder list that is right there on my Android home screen and lets me see all of my reminders without having to go into the application. And being able to dictate my reminder (I put in the dedicated dictation button because my Swype keyboard doesn't have a key for dictation like the stock Android keyboard does) makes it easy to add a quick note if you can tolerate a mistranslation here or there.

This version is free, so if you have an Android device running 2.1 or higher, feel free to check it out.

Monday, June 14, 2010

Preventing CSRF Attacks Using Event-Types in Model-Glue

A cross-site request forgery (CSRF) occurs when a hacker takes advantage of the fact that users don't always log out of the websites and web applications they visit. The hacker creates a URL or a form on a website they control that passes valid data to a valid destination on the target website and hopes that a user who is still authenticated to that target website clicks that malicious URL or form. If such a user falls into the trap, the target website will process the request just as if the user had executed the action within the target website under normal circumstances.

One common method for preventing CSRF attacks is to generate a unique value every time a user visits a form on the website and store that value both within the user's session and within the form itself as a hidden field. When the form is submitted, the value in the form is checked against the value stored within the user's session, and if they don't match the form submission isn't processed. The next time the user encounters a form (even if it's the same form), a new unique value is generated. Without a way of knowing what that unique value is at any given time, the hacker cannot build a form or construct a URL that simulates a legitimate request, and the attack fails.

Rather than have to remember to create these unique values and include them within every form (or every URL that executed some sort of data operation), and then check the validity of the submitted value on each processing page, I wanted to see if there was a way I could build CSRF security into the structure of my Model-Glue applications.

First, I wrote two new controller functions in my authentication/authorization controller CFC:

The secureTransmissionURL() function looks to see if there is a variable named "token" stored within the event object (for those unfamiliar with Model-Glue, the event object serves as a container for all of the variables associated with the request, including form and URL variables).  If no token variable exists in the requet, a variable named "token" is created or updated within the session scope and given a unique UUID value.

In the final line of the secureTransmissionURL() function, a new variable called "secureMyself" is created within the event object, and is given a value that serves as the starting point for any URL I want to protect against CSRF attacks within my Model-Glue application. This line deserves a bit of background information...

In Model-Glue (as with many of the ColdFusion frameworks), all requests run through the index.cfm page, and you dictate how the request should be routed by adding a particular variable (called the "eventValue" variable in Model-Glue) to the URL. In Model-Glue, the default name for that variable is "event," so if you kept that default, the URLs you would use to navigate within your Model-Glue application would look like this:

index.cfm?event=deleteRecord&recordId=12

Because it is possible to change that eventValue variable name from "event" to something else ("action", "goto", etc) with a simple change to the Model-Glue configuration settings in your application, it's not safe to hard-code "index.cfm?event=" into your URLs in your pages. So the standard practice is to use an event variable automatically provided by Model-Glue called "myself" to build your URLs. So instead of writing out "index.cfm?event=mainMenu", you would do something like this on your web page:

<cfset deleteRecordURL= event.getValue("myself") & "deleteRecord">
<cfoutput>
...
<a href="#deleteRecordURL#&recordId=12">Delete record 12</a>
...
</cfoutput>

(Note: normally the name of the event/event handler, in this case "deleteRecord", would actually come from an event variable as well, but I wanted to keep my example simple)

The "secureMyself" variable created in that final line of secureTransmissionURL() serves as a CSRF-secured alternative to the "myself" variable provided by Model-Glue. It adds the hashed value of the UUID value stored in the session scope to the "token" URL variable in front of the eventValue variable in the URL string, allowing me to use "secureMyself" to build my URLs in place of "myself" where needed (note: I would still use "myself" to build URLs that don't directly process data, such as a URL that sent the user to a menu page):

<cfset deleteRecordURL= event.getValue("secureMyself") & "deleteRecord">
<cfoutput>
...
<a href="#deleteRecordURL#&recordId=12">Delete record 12</a>
...
</cfoutput>

When the secured URL is rendered by ColdFusion, it ends up looking something like this:

index.cfm?token=524606212847B725A8AD313DD466CDCF66F8FC22B49DC31D525D51FC33B1E297&event=deleteRecord&recordId=12

The second function, the validateTransmissionURL(), is meant to be executed prior to processing a CSRF-secured page request. It checks to see if a token variable was included in the request, and if so it checks if the value of the submitted token matches the hashed value of the token variable stored in the session. If either of those conditions fail, a result of "invalidTransmission" is added to the event object, which effectively prevents the request from proceeding to the code that processes the request (that interacts with your persistent data).

After adding these two functions, I then incorporated them into my application using the following two event types:

If you're unfamiliar with event types in Model-Glue, I encourage you to read the documentation on the Model-Glue wiki. In my application, all of my event handlers that are only accessible to the user after they've authenticated/logged in are wrapped with the "permitted" event type defined above. By adding a message broadcast that calls my secureTransmissionURL() controller function to that event type, I ensure that the "secureMyself" event variable is available to use on all of my authenticated view pages.

The "validateTransmission" event type, which will make sure that the submitted URL contains the proper token value, will be applied only to my event handlers that process a form submission or execute a database transaction based on URL variables submitted in the request.  If the token is missing or incorrect, Model-Glue redirects the action to the "invalidTransmission" event handler, which will react to the possible CSRF attack. My "invalidTransmission" event handler presents an normal error message to the user (as it's the user, not the hacker, that will see the result of the attack) but notifies me that a possible CSRF attack has occurred.

Once I had these controller functions and event types in place, all I needed to do to secure my forms and hyperlinks against CSRF attacks was to use the "secureMyself" event variable to build the URLs for those forms and hyperlinks and to add the event type "validateTransmission" to those event handlers that processed submissions from those forms and hyperlinks.

If you want to learn more about securing against CSRF attacks, I would recommend that you read some of the blog posts that helped me understand CSRF attacks:

http://shiflett.org/articles/cross-site-request-forgeries

http://www.mollerus.net/tom/blog/2009/01/an_easy_block_for_crosssite_request_forgeries_csrf.html

http://www.12robots.com/index.cfm/2008/8/25/Request-Forgeries-and-ColdFusion--Security-Series-9

http://www.12robots.com/index.cfm/2009/2/9/Enhancing-Request-Forgery-Protection--Security-Series-91

Thursday, May 20, 2010

Quick Android Development Tip: Reusing Layouts With Includes

My last few Android development posts have been kind of long (took long to write anyway), so here's a short one...

When you develop websites, you often end up with a lot of pages that all share a certain block of layout or content. You would typically handle this by making a single separate file for that global content and pulling it into the other pages via some sort of include mechanism (virtual include, <cfinclude>, etc.).

Well, you can do the same thing in Android: you can create a separate layout XML file (say, for a header or a menu bar) and then include it in your other layout files, like so:


Wednesday, May 19, 2010

Defining Other Global Resources in Your Android Application

In my last post, I talked briefly about how the R.java file, a resource file located in the "gen" folder of your Android application project that is automatically generated and updated by Eclipse and serves as a resource map. My example code demonstrated how you could reference layout.xml files via the R.java file and how Eclipse would register the id of the UI objects within the R.java file as well.

I also mentioned that the layout XML files for your Android app are located in a "layout" folder within the "res" ("resources") folder.  There are other folders under the "res" folder as well, and the content within those folders is also registered with the R file, allowing you to access those resources within your Android code.

Here's a screenshot of what the "res" directory of my current Android project looks like:

The first three folders are "drawable" folders where you put any images you want to use in your application. As I alluded to in an earlier post, Android supports different screen resolutions through the concept of density-independent pixels, in that higher-resolution screens have a larger number of pixels per inch than a lower resolution screen (you can read more about how that works on the "Supporting Multiple Screens" page on Android Developer website).  The three different drawable folders allow you to have three different copies of the same graphic (with the same filename), one for high density/resolution screens ("hdpi"), one for medium density screen ("mdpi"), and one for low density screens ("ldpi").  So if I place a copy of a graphics file called "blueBox.png" in each of the drawable folders, I can reference it in my Android code via the filename (minus the extension) like so:

R.drawable.blueBox

...and (unless I've specifically said my application will only work with a certain pixel density) Android will take care of figuring out which copy of the image file it should display.

We can skip the "layout" folder since I've already talked about how to reference layout files in my previous post, so that leaves the "values" folder.

The first file in my "values" folder is colors.xml.  In Android, you're encouraged to record the color codes of your UI elements in this file (which you have to create).  Here's what the XML looks like:

<?xml version="1.0" encoding="utf-8"?>
<resources>
    <color name="pageColor">#fff</color>
    <color name="normalTextColor">#000</color>
    <color name="listItemColor">#333</color>
    <color name="goodColor">#009900</color>
    <color name="badColor">#ff0000</color>
</resources>

...so if you wanted to make a view object in your layout have the "pageColor" background (white, in this case), you'd reference it in your layout XML like so:

<ListView android:id="@+id/android:list"
  android:layout_width="wrap_content"
  android:layout_height="wrap_content"
  android:background="@color/pageColor" />

The "@color" sign tells Android that we're referencing a color name registered in the resource file, so it knows how to retrieve the value. And again, you can reference these color values in your code (in case you want to change the color of an element or some text in response to some change or condition):

mStatusText.setTextColor(R.color.goodColor);

The second file in the "values" folder is strings.xml. As you can probably guess, it's meant to hold string values that you might use in one or more places in your application, things like screen headers or form labels. But it can also be used to define arrays of strings for use in scrollable lists or drop-down controls (like a list of U.S. states). Here's what it looks like:

<?xml version="1.0" encoding="utf-8"?>
<resources>
    <string name="app_name">To-Do List</string>
    <string name="empty_list_message">There are currently no items</string>
    <string-array name="priority_choices">
     <item>High</item>
     <item>Normal</item>
     <item>Low</item>
    </string-array>
    <string name="delete_button_text">Delete</string>
    <string name="save_button_text">Save</string>
</resources>

You would reference a string resource much as you would a color resource, using "@string/app_name" as an attribute value in your layout XML or referencing the string programmatically using "R.string.app_name". To reference a string array, however, you'd use "R.array", as in "R.array.priority_choices", in your Android code (I'm not sure if there's a scenario in which you could reference a string array in your layout).

Finally, there's one more type of resource you can define in an XML file in the "values" directory: styles. I haven't used styles in any of my Android projects yet, but according to the "Applying Styles and Themes" page on the Android developer website, you can create a <style> block in XML that sets values for various visual attributes of view objects (size, typeface, font size, etc.) and then apply that entire set of attributes to a view object in your layout.

Wednesday, May 12, 2010

Interacting With UI Objects From the Layout in an Android Activity Object

In my last post, I promised to show how I would attach my simple example layout to an Activity object and make a change or two.

Here's the layout XML again:

Every Android project contains a "res" (reources) folder, which contains a number of subfolders, including one called "layout." This is the folder where you store your layout XML files. You can only use lowercase letters, numbers, periods, and underscores in your layout XML file name (don't know why, that's just the rule), so I'll call mine example_layout.xml.

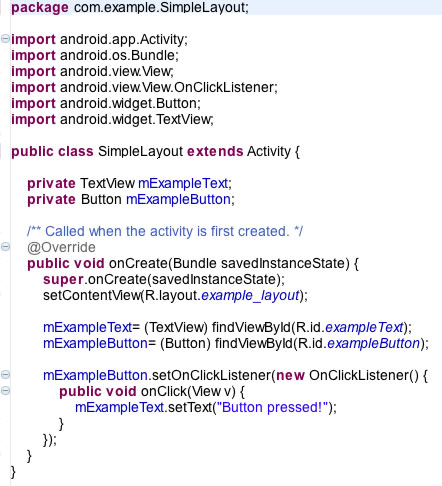
Now that that is out of the way, time to start looking at the activity class, which I've called SimpleLayout.  Here it is in its entirety as a screenshot from Eclipse:

Every class file starts out with a package statement and then import statements to import any Android or Java classes you need to use in your activity class. In this case, all of the imported classes are from the Android API.  After the import statements comes the class declaration:

public class SimpleLayout extends Activity (

...which simply says that the SimpleLayout class is a subclass of the Android Activity class, and therefore inherits all of the properties and methods normally found in an Activity object.

After that comes any member variable declarations. Here I declare two private variables, a TextView object called mExampleText and a Button called mExampleButton. They're not assigned a value; they're just declared.

  private TextView mExampleText;
  private Button mExampleButton;

The real action starts with the onCreate method. In Android, when an activity component (a UI screen) is created in memory for the first time, the onCreate method of the activity is called and the code within it is executed. This is when I want to pull in my layout containing your UI objects, so first I make a call to the original onCreate method inherited from the Activity class, and then I call the setContentView method of the Activity class:

public void onCreate(Bundle savedInstanceState) {
    super.onCreate(savedInstanceState);
    setContentView(R.layout.example_layout);

Note the parameter that's passed into the setContentView method: "R.layout.example_layout". The "R" references the R.java file found in the "gen" folder of every Android project. The R.java file is automatically generated and updated by Eclipse and serves as a resource map for various aspects of the project. The moment I created the example_layout.xml file in the "layout" directory, Eclipse added a reference to that file to R.java as an int variable under the "layout" static class, and I can pass that reference to setContentView.

I make use of the R.java file once again in the next two lines:

    
    mExampleText= (TextView) findViewById(R.id.exampleText);
    mExampleButton= (Button) findViewById(R.id.exampleButton);

Now that the layout has been processed by setContentView, I can assign the TextView and Button objects from my layout to the two member variables I declared earlier. Looking back at the layout XML file, you'll note that both the TextView and the Button were assigned id values using the "android:id" attribute:

        
        <TextView android:id="@+id/exampleText"
        ...
        <Button android:id="@+id/exampleButton"
        ...

The "@+id/" part of the id attribute basically tells Android/Eclipse that we want references to these objects added to the R.java file, keyed to the id values provided ("exampleText" and "exampleButton"). So now referencing those view objects in the code of our SimpleLayout class can be accomplished by simply calling for the object by id using the findViewById method (another method inherited from the Activity class).

Now that I have programmatic references to the TextView and Button objects from my layout, I have access to the properties and methods of those objects and can act upon them. The last three lines of the onCreate method basically tells the Button object to change the text in the TextView object when the Button is pressed:

    
    mExampleButton.setOnClickListener(new OnClickListener() {
        public void onClick(View v) {
            mExampleText.setText("Button pressed!");
    }

And there you have it...

Tuesday, May 11, 2010

Creating Screen Layouts in Android Using XML

In my last post, I alluded to the fact that you can lay out your visual elements and controls on your Android application screens (your Activity objects) using XML. In this post, I'm going to give you a peek at what that XML looks like.

Here's an example of a super-basic layout XML file:


The first line is a typical XML declaration statement. The next line is the start of a LinearLayout view object, which serves as a visual container for other view objects. The first attribute of the LinearLayout tag defines the XML namespace (that has to be the first attribute of the first view object of every Android layout file you create). This LinearLayout container is set to fill the entire width and height of its parent container. In this case, since it is the main container object, it fills the whole screen. The "android:orientation" attribute is set to "vertical" which means that all of the child objects within the LinearLayout will be arranged vertically, even if one or more objects could fit together horizontally. Seeing the LinearLayout for the first time reminded me of the VBox and HBox layout elements in Adobe Flex, which also uses a domain-specific XML language to define screen layouts.

The second object in the layout (the first within the LinearLayout) is a TextView object, which as you might guess displays text. The "android:id" attribute assigns an id value of "exampleText" to the TextView object. The "android:layout_height" and "android:layout_width" attributes are set to "wrap_content." Normally, that means that the object will only be large enough to contain whatever's inside of it plus any padding, but it won't be in this case (which I'll explain shortly). The left and right padding are set to 5dip (density-independent pixels), a pixel scale used by Android to accomodate the different device screen sizes. The other attributes are fairly self-explanatory except for "android:layout_weight", which is something more easily explained by the examples coming up shortly.

The third and final object is the Button object, and you can guess what it does. Note that its "android:layout_width" attribute is set to "fill_parent", so it will be as wide as the screen is, even if the Android device is re-oriented from portrait to landscape.

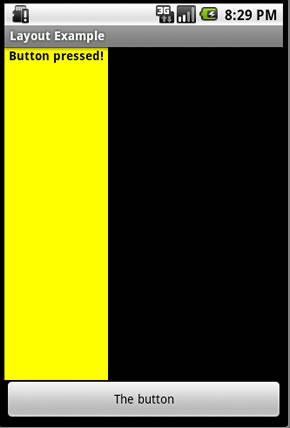
Now, here's how the layout looks in the Android emulator that comes with the Android Eclipse plugin:


As I mentioned before, the height and width of the TextView object was set to "wrap_content", meaning that the TextView should be just as wide and as tall as it needs to be to enclose whatever is inside it plus the padding. The width is just long enough to contain the content horizontally, but why is it so tall? It's because of the "android:layout_weight" attribute. In Android, you cannot do percentage-based heights and widths like you can with HTML elements. Instead, you can assign layout weight values to view objects to assign a level of "importance." More important objects take up more of the available layout space, while less important objects take up the remainder.

The default layout weight of all view objects is zero. An "android:layout_weight" value of 1 denotes a more important object, while a value of 2 denotes an even more important object. Right now, both the TextView and the Button have a layout weight of 1, so they take up an equal amount of vertical space (because they are in a vertically-organized LinearLayout). If the Button's layout weight was changed to 0, however:


...then the Button's height gets reduced in deference to the importance of the TextView.

Personally, I'm still getting the hang of using layout weights. Fortunately, I don't have to run the layout through the emulator every time I want to see the results of my latest change to the XML. The Android plugin for Eclipse lets you view layouts either as raw XML or within a graphical layout view that lets you add view objects to your layout via drag-and-drop and see the results of the property changes you make as you make them:


It's not as nice as the layout designer in Flex/Flash Builder, but it's still nice to have.
In my next Android post, I'll show how to attach this layout to an Activity object, and make a few changes to the layout object programmatically.

Monday, May 10, 2010

Android Application Concepts: the Activity

Android applications can be constructed from four different types of components: activities, services, broadcast receivers, and content providers. Of the four, the only one that you must use at least one of in every application (and the only one that I've had to use so far) is the activity.

I'm not going to even try to give a full explanation of what an activity is: the Application Fundamentals page on the Android Developers site provides a thorough (and rather long) explanation of activies as well as the other three components. So I'm just going to list some aspects of activities to give you a conceptual overview of what an activity is:

  • Each individual screen within an Android application is an activity, and users can perform actions by interacting with the visual components within an activity. Think of it as an individual web page within a modern web application, where the user can perform certain functions without leaving the page (using JavaScript), but must proceed to a different page in order to access a new set of tasks/functionality.

  • Each activity operates independently of one another (again, similar to how individual pages in a web application are separate from one another).

  • The visual objects within an activity (blocks of text, input boxes, buttons, etc.) are usually organized and instantiated by implementing instructions within a layout XML file.  They CAN be added individually with regular Java code, but the XML method is the recommended practice.

  • The transistion from one activity to another is accomplished through the use of asynchronous messages called Intents. An intent can be used to pass data from one activity to another, and that data is structured using key/value pairs. It's similar to how data is passed when an HTML form is submitted.

  • Each activity in an Android application is either a direct subclass of the Activity base class or a subclass of an Activity subclass that provides specialized functionality (such as the ListActivity class which contains methods specifically for the display of data in a touch-enabled list), and is represented in the application package as a single Java class.

  • All of the activities in the application must be defined in the application's manifest file, an XML file that keeps track of all of the components, resources, and permissions that make up the application.

  • All Android application components, including activities, have lifecycles. The current lifecycle state of a component provides part of the information the Android OS uses when it determines what components can be safely removed from memory in order to free up memory space. All activities inherit a set of lifecycle methods from the Activity base class that are executed when the corresponding lifecyle state of the activity is reached. These lifecycle methods are:

    • onCreate: the code within the onCreate lifecycle method is called when the activity is instantiated/loaded into memory. This is the method in which you want to set up the intial state of your variables, instantiate the visual objects within the activity via your layout file, and bind your event listeners. If you're a jQuery user, think of it as the equivalent of the document.ready function.

    • onStart: the method called when the activity becomes visible to the user.

    • onResume: the method called when the activity is moved to the foreground of the visible space, when the user is able to not only see the activity but interact with it. After the onResume method is called, the activity is considered to be "running."

    • onPause: called when the activity is no longer in the foreground, usually as the result of another activity being started.

    • onStop: called when the activity is no longer visible to the user in either the foreground or background.

    • onRestart: called when the activity is being restarted (made visible again) after executing onStop but not onDestroy.

    • onDestroy: called just before an activity is destroyed/unloaded from memory.


  • Any activity that isn't currently "running" could potentially be removed from memory by the Android OS if available system memory is low. The more inactive an activity is, the better the chance of it being destroyed to reclaim memory, so an activity that is "stopped" is in more danger of being removed from memory than an activity that is "paused."

  • Because even an activity that is "paused" can be destroyed under extremely low memory conditions, it is a best practice to run code to store/save any persistent data within the activity within the onPause method just in case (kind of like how the auto-save function works in Microsoft Office to save your work every few minutes).

  • To preserve the current state of an activity (like filtered search results) rather than persistent data, you can use code in the onSaveInstanceState method to perserve that data in a Bundle object (which, like an intent, stores data in key/value pairs).  The onSaveInstanceState method in the activity is called by the Android OS itself as soon as the activity has the potential to be removed from memory. However, onSaveInstanceState is NOT called when the user explicitly takes action to destroy an activity (usually by exiting the entire application).

  • It is possible for one "application" to utilize activity objects from one or more different application packages (.apk files), given the proper planning and permissions.

Wednesday, May 5, 2010

Developing Native Android Applications: Not as Hard As You Might Think

Two months ago, my boss asked me to try and build a native Android application based on the mobile website I had created for the university's annual Maryland Day festival. Both he and I are part of an IT initiative in our department tasked with figuring out how best to provide IT services to smartphone users on campus, and while we have in-house expertise in iPhone development, none of us were familiar with what would be involved in building Android applications. So he asked me to give it a shot.

I started by going to the official Android developer site:  http://developer.android.com/index.html. I downloaded the Android SDK per the site instructions, then downloaded and installed the Eclipse plugins for doing Android development, and the files needed to work with the Android API I was targeting in my application. I went through the "Hello World" tutorial, where I learned the basics of starting an Android project in Eclipse, how to configure a simple layout, and how to run the device emulator. After going through a few more of the layout-oriented tutorials, I realized that I was missing out on a few of the concepts being discussed, so I stopped coding and started reading through the development guide pages on the site, where I learned about the different components you can use in Android applications, what they were used for, and how to use them.

After spending the first few weeks just learning from the documentation and the tutorials, I started to focus more of my attention on how to accomplish the tasks I needed to make my particular application work. The developer site didn't have examples that addressed some of the issues I needed to solve, so I starting searching the web. Sometimes I found exactly the answer I was looking for on an Android development forum. Other times, I was able to cobble together an approach based on answers to similar issues on all-purpose tech forums like StackOverflow. I was always able to find at least a clue, something that would point me to the right package in the API documentation. I also had to stray from the Android developer site anytime I needed to learn more about Java coding itself, as it's kind of assumed that the developer is confortable with Java programming (an incorrect assumption in my case).

By the time I was done, I had created a working Android application that:

  • Would check for updated event information at startup by making an HTTP call to an XML page. If the version number on the XML page was higher than the version number stored in the application's database, it would make an HTTP call to a ColdFusion page that output the updated event information as XML, parse the XML with a SAX parser, and update the application's SQLite database with the event data.

  • Provided the user with a number of different ways to find events by interest. Each listing (whether it was a list of events, a list of event sponsors, etc.) would be preceded by a search box, and as the user typed in the search box, the list would be filtered on-the-fly based on the search text.

  • Gave the user the ability to flag an event as a "favorite" by tapping a toggle button on the event detail page, which would update the event record in the SQLite table and allow them to pull up a list of all of their favorite events.

  • Gave the user the option of seeing a satellite map view of where the event was located using the Google Map API, with the event location marked with an particular icon based on what type of an event it was.

  • Gave the user the option of seeing a satellite map view that showed the user their current GPS location on campus and where the particular event was located.  The user's position on the map would be updated as the user made their way towards the event location.

Although it worked pretty well, there were a few minor bugs that I couldn't work out before the festival, and we weren't comfortable releasing it to the public having only been able to test it on particular Android phone model (the Motorola Droid), so it wasn't put into production.

Even though I went into the project with an open mind, I really hadn't expected to be able to build such a full-featured application, not as a first Android application and not with being a Java noob to boot. What made it possible was the excellent documentation on the Android developer site, the development tools within Eclipse (the code hinting/code correction, the automated compiler, the debugger perspective, and the device emulator), and the various tidbits of Android development how-tos out on the web. And thougth there were some moments of frustration, I generally enjoyed the experience.

I don't know how much more native Android development I'll be asked to do at my job, but I plan to create some Android apps on my own time now that I know how. And I plan to start blogging about Android development, not as an expert (I have a lot to learn yet) but as someone who's learning as he goes. So you can expect to see more Android and Android development content on my blog from here on out.

Monday, May 3, 2010

Quick Tip: Removing That Flash of Content Before jQuery Kicks In to Hide It

The focus of the jQuery UI Meetup I attended last week was on jQuery UI 1.8 and to work out some questions regarding future meetups, but of course some other topics came up as well. One of those other topics was the not-uncommon problem of having certain HTML content, meant to be hidden or styled by jQuery, briefly appearing in its raw form before the page has fully loaded and jQuery gets to do its thing. Apparently the term for this phenomenon is "FOUC", which stands for "flash of unstyled content."

Now, if you took it as an absolute that any and all uses of your web page had Javascript enabled, you could solve a FOUC problem by assigning a CSS style to the problem content that hid the content right from the get-go, and then you could use Javascript to reveal the content at the appropriate time. But such a solution would fail if the user had Javascript disabled--the content would never be visible to them--and it's contrary to the idea of progressive enhancement (the idea that the page is usable as is, but is enhanced when Javascript is available).

So in answer to the question on FOUC, Richard Worth (the speaker for the meetup) pointed us to the following blog post by Karl Swedberg:

http://www.learningjquery.com/2008/10/1-way-to-avoid-the-flash-of-unstyled-content

The post provides a pretty good explanation of the technique (which is pretty simple), so I don't feel the need to explain it or add to it. Just thought I'd put it out there because it would be hard to find via a web search if you didn't know how to describe the problem and didn't know the FOUC acronym.

Tuesday, April 27, 2010

Create Wireframe Site Mockups With An Eclipse Plugin (Works in CF Builder Too)

Earlier today, Dan Vega tweeted:

"this is pretty freaking cool, works in ColdFusion Builder! http://wireframesketcher.com/blog"

So I went and checked it out. WireframeSketcher is an Eclipse plug-in that lets you create wireframe page mockups, similar to Balsamiq Mockups.  I download the trial version and took it for a brief spin. You simply create a new blank Screen file and start dragging and dropping page elements from the Palette view (labels, text boxes, tabbed panes, etc.) onto the Screen, resizing and re-positioning as you go. When you're finished, you can export the file as a PNG or a PDF file.

The WireframeSketcher website mentioned that the layout information for each screen was stored as XML data, so the thought crossed my mind that maybe you could feed the XML to a parsing script that could use that data to output actual HTML/CSS. Unfortunately (as I kind of suspected), the positioning of the wireframe elements is achieved with hard-coded x and y pixel coordinates, and it would be hard to translate that into the kind of relative or "in the flow" positioning used on most web pages.

Still, if you want to add a wireframing tool to your toolset and you already use Eclipse or an Eclipse-based IDE (by the way, these guys specifically name Flash Builder and ColdFusion Builder as compatible IDEs, so props to them for being aware of the Adobe tools), this is probably worth checking out. You can try it out for free for at least a week before you get prompted to pay for a license.

Tuesday, March 30, 2010

E-readers: No One Has All the Answers Yet

Today I attended a presentation about a joint study being conducted between the English and Computer Science departments at the University of Maryland regarding the use of e-readers for academic reading. What was interesting about the study was that it wasn't just about whether students preferred using an e-reader device over standard textbooks, but whether the simultaneous use of TWO e-reader devices was more conducive to academic reading.

On the surface, using two devices to read instead of one seems a bit odd, but the premise of the study was based on research that showed that individuals engaged in academic reading (reading to learn, to synthesize information and translate into research notes) often had two or more sets of reading material (books, research papers, etc.) in front of them, and that they would go back and forth between those sources as they took their notes.

So at the beginning of the semester, the students in this literature course (which appropriately is a course that studies the history and future direction of books) were each given one of these e-reader devices developed by the Computer Science department. Each of these e-readers were about 7"x10", used E-ink for the display, allowed students to write notes with a stylus, and were optimized for quick page refreshes and overall book navigation. Now that the students have had a few weeks to acclimate to the use of the readers, they are each going to get a second one and try using them simultaneously. Although the presenter didn't go into great detail, the e-readers apparently have the ability to transfer and synchronize data with each other, so the students can decide to tackle the same source material with both devices or perhaps create references between two different documents.

To me, studies like these really highlight the fact that the e-reader market is still a young market and that no one has all the answers. Mainstream e-readers like the Kindle, the Nook, and the almost-here iPad may lead the e-reader market when it comes to casual reading, but there hasn't been as much of a focus on what works when it comes to e-readers for academic or professional use. As was discussed after the presentation, there may be a shift in the very concept of a "book" is as people explore not only different ways of consuming text-based content, but ways of producing and presenting the content, perhaps with the addition of other types of media.

It'll be interesting to see what comes out of all of this several years down the road.

Saturday, January 30, 2010

HTML 5 Geolocation Functions and Mobile Web Browsers: Show the User Where They Are (Sort Of)

Every April, the University of Maryland holds a huge open-house event called Maryland Day that draws 60,000+ visitors to the campus to view exhibits highlighting the research conducted at the university and participate in various events and activities. All of the event details are entered into a ColdFusion application, and one of those details is the GPS coordinates (latitude and longitude) of where each event is taking place so visitors to the website can see where the events are located on Google Maps.

Now that smartphones are becoming more prevalent, I wanted to see if it was possible to build a web application that would show the user where they were currently located and then show them on a map how to get from their current location to a particular event.

So I did some research and learned that HTML 5 comes with a Geolocation API. This API allows you to execute Javascript functions within the navigator.geolocation object built into the browser that retrieve the supposed latitude and longitude coordinates of where the browser is located (and, if available, the altitude, heading, and speed at which the browser is moving).

Using the code examples I found on the Gelocation API page on the W3C website and on Oliver Wehren's geolocation demo page, I was able to create my own test page for determining my location and marking it on Google Maps. I then tried using the page with my Motorola Droid, my iPod Touch, and my manager's iPhone.

The default web browsers on all three devices implemented the Geolocation API (my preferred browser on my Droid, the Dolphin Browser, did not). Each of the browsers displayed a confirmation dialog asking for permission to share my location information with the web page (as mandated by the standard), and once I permitted the information to be used, my test page was able to place a marker denoting my location on the map.

However, the location wasn't as accurate as I had hoped. Although the API was coded to accept location data from the on-board GPS system in a mobile device, neither the iPhone nor the Droid seem to provide GPS data to the browser. If I was connected to the campus wireless network, my location was determined via the network topography, and it could be off by as much as 150 feet or so. The accuracy was even worse if I was relying solely on 3G: in that scenario, but the iPhone and the Droid had me located on the side of a state road on the outskirts of campus, a good twenty minute walk from where I actually was. I have no idea what caused both devices to pick that particular spot, as there certainly wasn't a cell tower anywhere near that location.

So I came to the conclusion that while the Geolocation API could be used to determine what town, city, or general area a user was currently in, it wasn't accurate enough (at least with these browsers in these devices) to provide walking or driving directions within a small area, especially given the fact that many of the users for the service I had in mind would only have access to the Internet via a 3G connection.

But if someone knows of a way of increasing the location accuracy of the Geolocation API, a way that doesn't require the end-user to modify their mobile browser in order to make it work, I'd love to hear about it.

Monday, January 18, 2010

Quick Tip: Securing Your Model Glue XML Configuration Files

A quick disclaimer: nothing I'm about to say here is all that revolutionary.  Others, particularly Charlie Griefer, have posted about this technique before, just not with a specific focus on using it with Model-Glue or with exact step-by-step instructions.

There are a number of key configuration files in Model-Glue that exist as plain XML files. One of the drawbacks to using XML files on a website is that anyone can point their browser at the XML file and read its contents, which is less than ideal from a security standpoint.

There are a number of ways you can make those XML files secure, such as storing them in a directory outside of the web root or configuring your web server to block access to XML files (see Charlie's post for details on those techniques), but not every developer has the permissions needed to implement those solutions.

So one way that you can protect those XML files without needing access to anything beyond the web root is to convert them to .cfm files and prevent them from executing, and here are the exact steps you would use in a typical Model-Glue application to do just that:
  1. Go to the index.cfm file of your application.  Uncomment the <cfset> line for "CUSTOM APPLICATION CONFIGURATION" and set it to point to "Coldspring.xml.cfm" instead of "Coldspring.xml".
  2. Rename "ColdSpring.xml" to "ColdSpring.xml.cfm". 
  3. In the ColdSpring file, go to the ModelGlue configuration bean definition and change the "configurationPath" and "scaffoldPath" values to point to the .cfm equivalent files instead of the original XML ones.  If you're using Transfer or Reactor in your application, also update any <constructor-arg> tags in those bean definitions that point to the XML configuration files for those ORM frameworks.
  4. If you have any other references  to .xml files in your ColdSpring file, update those as well.
  5. In the ModelGlue.xml file in your application, remove "<cferror>" from the comment above the "page.error" event (if you don't, anyone who does try to browse to that file will generate a ColdFusion error).
  6. Tack on ".cfm" to the file names of all of the .xml files referred to in steps 3, 4, and 5.
  7. Add an Application.cfm file to the "config" directory of ModelGlue with one line in it: <cfabort />  That will ensure that the XML is not shown even in the page source if the .xml.cfm file is directly accessed by the browser.
The end result of taking these steps is that if anyone tries to point their browser to any of these renamed configuration files (ModelGlue.xml.cfm, ColdSpring.xml.cfm, etc.) all they will get back is a blank page with no source code to view.

Tuesday, January 5, 2010

Soft Deletes Verses Real Deletes When Doing CRUD Interactions

I happened to stumble across a blog post today by Phil Haack with the title "Death to confirmation dialogs with jquery.undoable." In it, Phil explained how he was inspired to write his plugin by seeing how his Netflix queue allowed him to "undo" the deletion of an item from the queue. As he said in his post:

"Notice that there’s no confirmation dialog that I’m most likely to ignore questioning my intent requiring me to take yet one more action to remove the movie. No, the movie is removed immediately from my queue just as I requested. I love it when software does what I tell it to do and doesn’t second guess me!"

His post got my attention because I'm currently in the middle of designing a scaffolding/code generation system, specifically to output pages for performing CRUD (Create, Read, Update, Delete) tasks, and it's currently designed so that when the user clicks on a "delete" link for a record (and Javascript is enabled), I make the user confirm their decision via a customizable dialog box (via the jqModal jQuery plugin) before proceeding with the deletion.

So I got to thinking about what would be involved in doing what he was suggesting: allowing the user to "delete" a record without confirmation as long as they had the option of undoing that action while still on the page.

I put "delete" in quotation marks because such a process would almost certainly involve making the delete a "soft" delete: marking/tagging the record as being deleted but not actually deleting the underlying database record. Undoing an actual deletion would be much harder, given that you would lose the unique record id in the deletion in addtion to the rest of the record data. I suppose you could potentially store the data from the record client-side (in the page) so the "undo" record could recreate the record from scratch, but that would be a pain and might not be feasible in every scenario. Undoing a soft delete/changing the delete flag in the record, on the other hand, would be pretty easy.

But if I went the soft delete routine, then the question would become: how do those records get deleted for real? I tend to design my web applications with a long term view, and I don't want the application database tables to fill up with deleted records over a number of years. My clients typically only have access to the database tables via the application itself, so leaving that up to them is not an option. So I would either have to given them another page/tool in the web application (perhaps a tool restricted to a tech-savvy few) to actually remove the deleted records, or perhaps run a scheduled task to remove those database records that have been marked for deletion for a year or more.

After some consideration, my current inclination is to stay with my current confirmation dialog/deletion routine. In most of my applications, the CRUD interactions are reserved for the administrative users of the application, who typically know when it's appropriate to delete a record. And the need to delete a record via the CRUD tools provided is usually rare, so having a confirmation dialog come up for each instance isn't too much of an annoyance.

But I'd be curious to hear other people's thoughts on this topic.