In my last post, I promised to show how I would attach my simple example layout to an Activity object and make a change or two.
Here's the layout XML again:
Every Android project contains a "res" (reources) folder, which contains a number of subfolders, including one called "layout." This is the folder where you store your layout XML files. You can only use lowercase letters, numbers, periods, and underscores in your layout XML file name (don't know why, that's just the rule), so I'll call mine example_layout.xml.
Now that that is out of the way, time to start looking at the activity class, which I've called SimpleLayout. Here it is in its entirety as a screenshot from Eclipse:
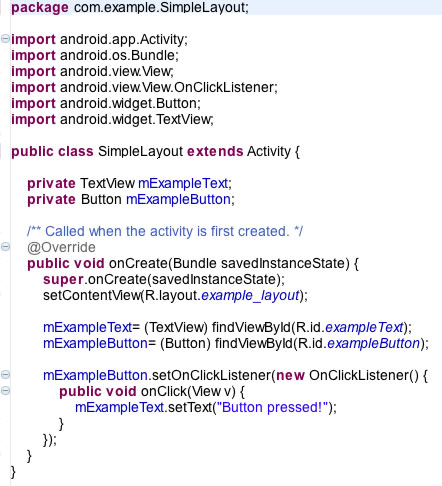
Every class file starts out with a package statement and then import statements to import any Android or Java classes you need to use in your activity class. In this case, all of the imported classes are from the Android API. After the import statements comes the class declaration:
public class SimpleLayout extends Activity (
...which simply says that the SimpleLayout class is a subclass of the Android Activity class, and therefore inherits all of the properties and methods normally found in an Activity object.
After that comes any member variable declarations. Here I declare two private variables, a TextView object called mExampleText and a Button called mExampleButton. They're not assigned a value; they're just declared.
  private TextView mExampleText;
  private Button mExampleButton;
The real action starts with the onCreate method. In Android, when an activity component (a UI screen) is created in memory for the first time, the onCreate method of the activity is called and the code within it is executed. This is when I want to pull in my layout containing your UI objects, so first I make a call to the original onCreate method inherited from the Activity class, and then I call the setContentView method of the Activity class:
public void onCreate(Bundle savedInstanceState) {
    super.onCreate(savedInstanceState);
    setContentView(R.layout.example_layout);
Note the parameter that's passed into the setContentView method: "R.layout.example_layout". The "R" references the R.java file found in the "gen" folder of every Android project. The R.java file is automatically generated and updated by Eclipse and serves as a resource map for various aspects of the project. The moment I created the example_layout.xml file in the "layout" directory, Eclipse added a reference to that file to R.java as an int variable under the "layout" static class, and I can pass that reference to setContentView.
I make use of the R.java file once again in the next two lines:
    mExampleText= (TextView) findViewById(R.id.exampleText);
    mExampleButton= (Button) findViewById(R.id.exampleButton);
Now that the layout has been processed by setContentView, I can assign the TextView and Button objects from my layout to the two member variables I declared earlier. Looking back at the layout XML file, you'll note that both the TextView and the Button were assigned id values using the "android:id" attribute:
        <TextView android:id="@+id/exampleText"
        ...
        <Button android:id="@+id/exampleButton"
        ...
The "@+id/" part of the id attribute basically tells Android/Eclipse that we want references to these objects added to the R.java file, keyed to the id values provided ("exampleText" and "exampleButton"). So now referencing those view objects in the code of our SimpleLayout class can be accomplished by simply calling for the object by id using the findViewById method (another method inherited from the Activity class).
Now that I have programmatic references to the TextView and Button objects from my layout, I have access to the properties and methods of those objects and can act upon them. The last three lines of the onCreate method basically tells the Button object to change the text in the TextView object when the Button is pressed:
mExampleButton.setOnClickListener(new OnClickListener() {
public void onClick(View v) {
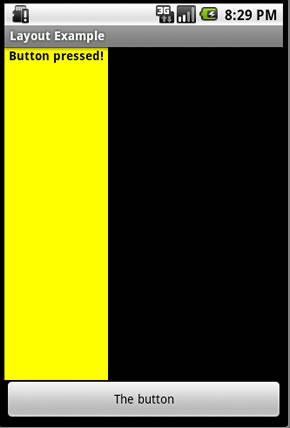
mExampleText.setText("Button pressed!");
}
And there you have it...

No comments:
Post a Comment