Showing posts with label Mobile. Show all posts

Friday, May 25, 2012

Converting Letters in Phone Numbers to Their Corresponding Digits

In a recent post, I mentioned that the feature that allows a user to tap on a phone number in their smartphone web browser and dial that number doesn't work if the phone number contains letters.  Well, some of the phone numbers in the database tables I'm working with contain letters (usually to spell out building abbreviations) so I needed to convert those letters into the corresponding digits on American phones (apparently it's not an international standard).

Before writing my own function to do this, I did some Googling and was a bit surprised to find that while folks have written routines in CFML to strip out dashes and such, no one had really written (and then published) a routine for this task.  So here's mine:

(Shrug) Nothing fancy, but it works. If you need to do additional adjustments to the phone number (like I did), you can just add them to this function or put them in separate functions (which is probably better).

Wednesday, April 4, 2012

Letters In Place of Numbers in Phone Number Links on Mobile Phones

Part of an upcoming project involves displaying office phone numbers on a web page such that, if the page is being viewed on a smartphone, tapping on the number pulls up the phone's dialing program with the number filled in and the user just needs to start the call.

Some of the phone numbers in question use letters in place of numbers (like "1-800-555-CFML" as an example) and I wondered if such numbers would work.

The answer is "probably not," as it's not something supported in the spec (the spec being RFC3966).  Tried it on my Galaxy Nexus anyway: no dice.  So I'll have to convert any such letters to their numerical equivalent

Some other things I learned today:

  • Per the W3C recommendation regarding "click-to-call" links, you should always include the "+" sign in front of the number to support international callers ("+1-800-555-CFML").
  • You can also use "." as a separator instead of a "-", and you can get away with using both types of separators in the same number.

Monday, October 3, 2011

Two Thoughts On Today's Adobe MAX (2011) Day One Keynote

I'm not going to try and summarize the keynote:  you can either watch the replay at http://www.max.adobe.com/online/ or read a brief synopsis at http://max.adobe.com/news/2011/keynote_day1.html.

My first thought is actually about some news that wasn't part of the keynote, but was announced on the Internet during the keynote:  Adobe's acquisition of PhoneGapPhoneGap is an application framework that allows developers to build mobile apps using web technologies (HTML, CSS, and Javascript) and the PhoneGap API (to access particular device functions like geolocation, the camera, internal storage, etc) and then package and deploy those apps such that they work on most mobile operating systems (Android, IOS, Blackberry, and a few others).

What struck me about that news was that it means Adobe now provides two ways for app developers to develop cross-platform apps.  If a developer is already familiar with Flash and Flex development, they can build mobile apps using Flash Builder and Adobe AIR.  If the developer is more skilled with web design and programming, they can build apps using PhoneGap.  In both cases, the end result is an app that runs natively on your device of choice (IOS, Android, whatever).

First of all, it's yet another example of Adobe's willingness to support both Flash and HTML5 as development platforms going forward.  A number of tech analysts contend that Adobe's development of new tools that play nice with HTML5 is a capitulation of some kind to the way the industry is moving.  I don't see it that way: Adobe may be synonymous with Flash, but it's never been all about Flash with them.  They have always supplied the tools that the digital and web creation markets have demanded, just as any sane company would, regardless of what their internal preferences might be.

The other thing about the PhoneGap acquisition is that it will expand the number of developers using Adobe tools and technologies to create mobile apps for both Android and IOS.  And now suddenly Adobe potentially a big player in the smartphone and tablet space, not by release their own mobile OS or mobile hardware, but by providing the tools to any developer who wants to write on any and all of these platforms.  To be clear, at the moment there are certain kinds of apps or app functions that a developer would want or need to develop in native OS code, but as the Adobe tools provide ways to overcome those limitations (such as the ability to include native code extensions in Flash/AIR apps), the number of reasons for writing an app in native OS code (and hence writing a second version for deployment on another platform) are going to become fewer and fewer.

My second observation regarding the keynote concerns the suite of touch-optimized mobile apps - the Adobe Touch Apps - coming in November to Android devices and later to IOS devices.  While some of the apps are geared more towards visual designers, the Proto wireframing app is something I could use in the design phase of my web and mobile application work, and, well, who wouldn't want a touch-optimized version of Photoshop to use to mess around with their photos?

And that's when the thought occurred to me:  here were some apps that I could use to be productive with a tablet.  I'm an application developer who writes code.  I have access to two tablets and I don't use either of them to write code or generate digital content of any kind.  For me, tablets have always been digital consumption devices (something Amazon seems to recognize with their new Kindle Fire tablet) for viewing video, looking at pictures, or reading web pages or books, and kinda superfluous given I can do all that and much more with a laptop (to be clear, I do love my Nook Color as an e-reader, but I rarely use it to surf the web or anything else).

But the apps Adobe showed off today made me feel like I would in fact want to use them on a tablet, because they were designed specifically with tablets and touch-interaction in mind, not as desktop apps shrunk into a mobile form factor.  That to me is a step in the right direction, and it's apps like those that are going to grow the tablet market by making the tablet experience more compelling.

Monday, June 20, 2011

An Overview of buzztouch, A Mobile App CMS for Non-Programmers

The other day I stumbled on a Make Use Of article about buzztouch, a "iPhone, iPad, Android app builder and content management system."  Since we're researching options for creating cross-platform mobile applications, and the article indictated that it was worth checking out, I decided to sign up and give buzztouch a spin.

buzztouch is designed to let non-programmers build a mobile app on the buzztouch website using a collection of web-based forms.  The app-building interface prompts you to create certain items, like a launcher icon for the app, a banner image for the home screen, and an "info" page for the app, but you choose what other content you wish to provide from a drop-down list of different components.  One component lets you create a screen of formatted text using CKEditor, while another lets you create an app screen using HTML, CSS, and Javascript.  There are components for pulling in remote content such as web pages, YouTube pages, streaming audio and video files, and RSS feeds.  One component lets you pinpoint one or more locations on a Google Map with brief location information that a user of the app can then use to get driving directions to those locations from their current position.  Even though I was casually playing with the system, I was able to create an app using several of these components in under two hours.

Once you've created the app, you can then download the native source code for the app:  you're provided with separated source code downloads for IOS and for Android.  The source code comes in a .zip file, which also contains a readme file with instructions on how to compile the source code for that particular platform and create the native app.  It only took me a few minutes to create an Android app from the source code, and it only took me that long because I had to provide a Google Maps API key to enable the mapping component I'd added (the readme provided exact instructions on the changes I need to make it the code to use the key).  I had my IOS developer colleague compile the IOS version of the app, and it was also smooth sailing for him.  The resulting app on the Android platform looked a little rough simply because of the generic design elements, but the IOS version looked pitch-perfect.

The first time you access any component or screen in the mobile app, there is a pause as the app retrieves the content or content instructions from buzztouch then caches it for local use.  This is where the content management system aspect of buzztouch kicks in:  any changes you make to the app on the buzztouch site get pushed to (or pulled by, not sure which) the mobile app.  So the app owner doesn't need to recompile and update the app through the App Store or the Android Market in order to make content changes.  If the mobile device doesn't have a network connection, then the cached content is used.

So what's my overall take on buzztouch?  I think that if you need to build a mostly informational mobile app, something that serves the same purpose as a mobile-optimized website, then buzztouch is a compelling option because of how easy it is to create the app and then update the content.  Even if your long-term strategy is to redesign an existing "desktop"-optimized website to be mobile-friendly as well, a buzztouch app could fill the void until that goal was reached.

If you need to build a mobile app that's more interactive, one where the user can send and receive custom data, then buzztouch is at best an incomplete solution.  There are no buzztouch components for collecting data (though the app itself will capture GPS info from the device in order to map where the app has been used, which is both useful and slightly disturbing), but you could probably use the Custom HTML component to create a web form that transmitted data via a regular form submit or via AJAX.  And there are as yet no components that let you access device-specific functions like the camera or accelerometer.

On the other hand, if you are capable of doing some IOS or Android coding, the native code provided by buzztouch could serve as a starting point for adding additional functionality:  the buzztouch folks seem to be open to folks using the generated code to advance their learning of native app programming.

So overall, I'm impressed with what buzztouch has done so far with the direction they've taken, and I hope they continue to improve on the platform.

Monday, June 28, 2010

My First Published Android App: NoteToSelf

I haven't been blogging much lately, but that's partly because I was on vacation for a week and partly because I was working on this:

https://play.google.com/store/apps/details?id=org.swartzfager.NoteToSelf

It's a fairly simple app built with the standard Android API, but it meets MY need for a note/reminder list that is right there on my Android home screen and lets me see all of my reminders without having to go into the application. And being able to dictate my reminder (I put in the dedicated dictation button because my Swype keyboard doesn't have a key for dictation like the stock Android keyboard does) makes it easy to add a quick note if you can tolerate a mistranslation here or there.

This version is free, so if you have an Android device running 2.1 or higher, feel free to check it out.

Thursday, May 20, 2010

Quick Android Development Tip: Reusing Layouts With Includes

My last few Android development posts have been kind of long (took long to write anyway), so here's a short one...

When you develop websites, you often end up with a lot of pages that all share a certain block of layout or content. You would typically handle this by making a single separate file for that global content and pulling it into the other pages via some sort of include mechanism (virtual include, <cfinclude>, etc.).

Well, you can do the same thing in Android: you can create a separate layout XML file (say, for a header or a menu bar) and then include it in your other layout files, like so:


Wednesday, May 19, 2010

Defining Other Global Resources in Your Android Application

In my last post, I talked briefly about how the R.java file, a resource file located in the "gen" folder of your Android application project that is automatically generated and updated by Eclipse and serves as a resource map. My example code demonstrated how you could reference layout.xml files via the R.java file and how Eclipse would register the id of the UI objects within the R.java file as well.

I also mentioned that the layout XML files for your Android app are located in a "layout" folder within the "res" ("resources") folder.  There are other folders under the "res" folder as well, and the content within those folders is also registered with the R file, allowing you to access those resources within your Android code.

Here's a screenshot of what the "res" directory of my current Android project looks like:

The first three folders are "drawable" folders where you put any images you want to use in your application. As I alluded to in an earlier post, Android supports different screen resolutions through the concept of density-independent pixels, in that higher-resolution screens have a larger number of pixels per inch than a lower resolution screen (you can read more about how that works on the "Supporting Multiple Screens" page on Android Developer website).  The three different drawable folders allow you to have three different copies of the same graphic (with the same filename), one for high density/resolution screens ("hdpi"), one for medium density screen ("mdpi"), and one for low density screens ("ldpi").  So if I place a copy of a graphics file called "blueBox.png" in each of the drawable folders, I can reference it in my Android code via the filename (minus the extension) like so:

R.drawable.blueBox

...and (unless I've specifically said my application will only work with a certain pixel density) Android will take care of figuring out which copy of the image file it should display.

We can skip the "layout" folder since I've already talked about how to reference layout files in my previous post, so that leaves the "values" folder.

The first file in my "values" folder is colors.xml.  In Android, you're encouraged to record the color codes of your UI elements in this file (which you have to create).  Here's what the XML looks like:

<?xml version="1.0" encoding="utf-8"?>
<resources>
    <color name="pageColor">#fff</color>
    <color name="normalTextColor">#000</color>
    <color name="listItemColor">#333</color>
    <color name="goodColor">#009900</color>
    <color name="badColor">#ff0000</color>
</resources>

...so if you wanted to make a view object in your layout have the "pageColor" background (white, in this case), you'd reference it in your layout XML like so:

<ListView android:id="@+id/android:list"
  android:layout_width="wrap_content"
  android:layout_height="wrap_content"
  android:background="@color/pageColor" />

The "@color" sign tells Android that we're referencing a color name registered in the resource file, so it knows how to retrieve the value. And again, you can reference these color values in your code (in case you want to change the color of an element or some text in response to some change or condition):

mStatusText.setTextColor(R.color.goodColor);

The second file in the "values" folder is strings.xml. As you can probably guess, it's meant to hold string values that you might use in one or more places in your application, things like screen headers or form labels. But it can also be used to define arrays of strings for use in scrollable lists or drop-down controls (like a list of U.S. states). Here's what it looks like:

<?xml version="1.0" encoding="utf-8"?>
<resources>
    <string name="app_name">To-Do List</string>
    <string name="empty_list_message">There are currently no items</string>
    <string-array name="priority_choices">
     <item>High</item>
     <item>Normal</item>
     <item>Low</item>
    </string-array>
    <string name="delete_button_text">Delete</string>
    <string name="save_button_text">Save</string>
</resources>

You would reference a string resource much as you would a color resource, using "@string/app_name" as an attribute value in your layout XML or referencing the string programmatically using "R.string.app_name". To reference a string array, however, you'd use "R.array", as in "R.array.priority_choices", in your Android code (I'm not sure if there's a scenario in which you could reference a string array in your layout).

Finally, there's one more type of resource you can define in an XML file in the "values" directory: styles. I haven't used styles in any of my Android projects yet, but according to the "Applying Styles and Themes" page on the Android developer website, you can create a <style> block in XML that sets values for various visual attributes of view objects (size, typeface, font size, etc.) and then apply that entire set of attributes to a view object in your layout.

Wednesday, May 12, 2010

Interacting With UI Objects From the Layout in an Android Activity Object

In my last post, I promised to show how I would attach my simple example layout to an Activity object and make a change or two.

Here's the layout XML again:

Every Android project contains a "res" (reources) folder, which contains a number of subfolders, including one called "layout." This is the folder where you store your layout XML files. You can only use lowercase letters, numbers, periods, and underscores in your layout XML file name (don't know why, that's just the rule), so I'll call mine example_layout.xml.

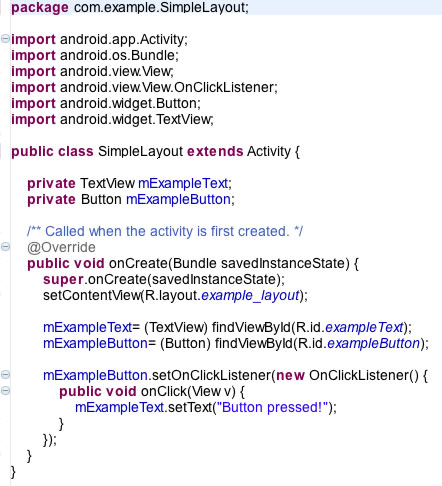
Now that that is out of the way, time to start looking at the activity class, which I've called SimpleLayout.  Here it is in its entirety as a screenshot from Eclipse:

Every class file starts out with a package statement and then import statements to import any Android or Java classes you need to use in your activity class. In this case, all of the imported classes are from the Android API.  After the import statements comes the class declaration:

public class SimpleLayout extends Activity (

...which simply says that the SimpleLayout class is a subclass of the Android Activity class, and therefore inherits all of the properties and methods normally found in an Activity object.

After that comes any member variable declarations. Here I declare two private variables, a TextView object called mExampleText and a Button called mExampleButton. They're not assigned a value; they're just declared.

  private TextView mExampleText;
  private Button mExampleButton;

The real action starts with the onCreate method. In Android, when an activity component (a UI screen) is created in memory for the first time, the onCreate method of the activity is called and the code within it is executed. This is when I want to pull in my layout containing your UI objects, so first I make a call to the original onCreate method inherited from the Activity class, and then I call the setContentView method of the Activity class:

public void onCreate(Bundle savedInstanceState) {
    super.onCreate(savedInstanceState);
    setContentView(R.layout.example_layout);

Note the parameter that's passed into the setContentView method: "R.layout.example_layout". The "R" references the R.java file found in the "gen" folder of every Android project. The R.java file is automatically generated and updated by Eclipse and serves as a resource map for various aspects of the project. The moment I created the example_layout.xml file in the "layout" directory, Eclipse added a reference to that file to R.java as an int variable under the "layout" static class, and I can pass that reference to setContentView.

I make use of the R.java file once again in the next two lines:

    
    mExampleText= (TextView) findViewById(R.id.exampleText);
    mExampleButton= (Button) findViewById(R.id.exampleButton);

Now that the layout has been processed by setContentView, I can assign the TextView and Button objects from my layout to the two member variables I declared earlier. Looking back at the layout XML file, you'll note that both the TextView and the Button were assigned id values using the "android:id" attribute:

        
        <TextView android:id="@+id/exampleText"
        ...
        <Button android:id="@+id/exampleButton"
        ...

The "@+id/" part of the id attribute basically tells Android/Eclipse that we want references to these objects added to the R.java file, keyed to the id values provided ("exampleText" and "exampleButton"). So now referencing those view objects in the code of our SimpleLayout class can be accomplished by simply calling for the object by id using the findViewById method (another method inherited from the Activity class).

Now that I have programmatic references to the TextView and Button objects from my layout, I have access to the properties and methods of those objects and can act upon them. The last three lines of the onCreate method basically tells the Button object to change the text in the TextView object when the Button is pressed:

    
    mExampleButton.setOnClickListener(new OnClickListener() {
        public void onClick(View v) {
            mExampleText.setText("Button pressed!");
    }

And there you have it...

Tuesday, May 11, 2010

Creating Screen Layouts in Android Using XML

In my last post, I alluded to the fact that you can lay out your visual elements and controls on your Android application screens (your Activity objects) using XML. In this post, I'm going to give you a peek at what that XML looks like.

Here's an example of a super-basic layout XML file:


The first line is a typical XML declaration statement. The next line is the start of a LinearLayout view object, which serves as a visual container for other view objects. The first attribute of the LinearLayout tag defines the XML namespace (that has to be the first attribute of the first view object of every Android layout file you create). This LinearLayout container is set to fill the entire width and height of its parent container. In this case, since it is the main container object, it fills the whole screen. The "android:orientation" attribute is set to "vertical" which means that all of the child objects within the LinearLayout will be arranged vertically, even if one or more objects could fit together horizontally. Seeing the LinearLayout for the first time reminded me of the VBox and HBox layout elements in Adobe Flex, which also uses a domain-specific XML language to define screen layouts.

The second object in the layout (the first within the LinearLayout) is a TextView object, which as you might guess displays text. The "android:id" attribute assigns an id value of "exampleText" to the TextView object. The "android:layout_height" and "android:layout_width" attributes are set to "wrap_content." Normally, that means that the object will only be large enough to contain whatever's inside of it plus any padding, but it won't be in this case (which I'll explain shortly). The left and right padding are set to 5dip (density-independent pixels), a pixel scale used by Android to accomodate the different device screen sizes. The other attributes are fairly self-explanatory except for "android:layout_weight", which is something more easily explained by the examples coming up shortly.

The third and final object is the Button object, and you can guess what it does. Note that its "android:layout_width" attribute is set to "fill_parent", so it will be as wide as the screen is, even if the Android device is re-oriented from portrait to landscape.

Now, here's how the layout looks in the Android emulator that comes with the Android Eclipse plugin:


As I mentioned before, the height and width of the TextView object was set to "wrap_content", meaning that the TextView should be just as wide and as tall as it needs to be to enclose whatever is inside it plus the padding. The width is just long enough to contain the content horizontally, but why is it so tall? It's because of the "android:layout_weight" attribute. In Android, you cannot do percentage-based heights and widths like you can with HTML elements. Instead, you can assign layout weight values to view objects to assign a level of "importance." More important objects take up more of the available layout space, while less important objects take up the remainder.

The default layout weight of all view objects is zero. An "android:layout_weight" value of 1 denotes a more important object, while a value of 2 denotes an even more important object. Right now, both the TextView and the Button have a layout weight of 1, so they take up an equal amount of vertical space (because they are in a vertically-organized LinearLayout). If the Button's layout weight was changed to 0, however:


...then the Button's height gets reduced in deference to the importance of the TextView.

Personally, I'm still getting the hang of using layout weights. Fortunately, I don't have to run the layout through the emulator every time I want to see the results of my latest change to the XML. The Android plugin for Eclipse lets you view layouts either as raw XML or within a graphical layout view that lets you add view objects to your layout via drag-and-drop and see the results of the property changes you make as you make them:


It's not as nice as the layout designer in Flex/Flash Builder, but it's still nice to have.
In my next Android post, I'll show how to attach this layout to an Activity object, and make a few changes to the layout object programmatically.

Monday, May 10, 2010

Android Application Concepts: the Activity

Android applications can be constructed from four different types of components: activities, services, broadcast receivers, and content providers. Of the four, the only one that you must use at least one of in every application (and the only one that I've had to use so far) is the activity.

I'm not going to even try to give a full explanation of what an activity is: the Application Fundamentals page on the Android Developers site provides a thorough (and rather long) explanation of activies as well as the other three components. So I'm just going to list some aspects of activities to give you a conceptual overview of what an activity is:

  • Each individual screen within an Android application is an activity, and users can perform actions by interacting with the visual components within an activity. Think of it as an individual web page within a modern web application, where the user can perform certain functions without leaving the page (using JavaScript), but must proceed to a different page in order to access a new set of tasks/functionality.

  • Each activity operates independently of one another (again, similar to how individual pages in a web application are separate from one another).

  • The visual objects within an activity (blocks of text, input boxes, buttons, etc.) are usually organized and instantiated by implementing instructions within a layout XML file.  They CAN be added individually with regular Java code, but the XML method is the recommended practice.

  • The transistion from one activity to another is accomplished through the use of asynchronous messages called Intents. An intent can be used to pass data from one activity to another, and that data is structured using key/value pairs. It's similar to how data is passed when an HTML form is submitted.

  • Each activity in an Android application is either a direct subclass of the Activity base class or a subclass of an Activity subclass that provides specialized functionality (such as the ListActivity class which contains methods specifically for the display of data in a touch-enabled list), and is represented in the application package as a single Java class.

  • All of the activities in the application must be defined in the application's manifest file, an XML file that keeps track of all of the components, resources, and permissions that make up the application.

  • All Android application components, including activities, have lifecycles. The current lifecycle state of a component provides part of the information the Android OS uses when it determines what components can be safely removed from memory in order to free up memory space. All activities inherit a set of lifecycle methods from the Activity base class that are executed when the corresponding lifecyle state of the activity is reached. These lifecycle methods are:

    • onCreate: the code within the onCreate lifecycle method is called when the activity is instantiated/loaded into memory. This is the method in which you want to set up the intial state of your variables, instantiate the visual objects within the activity via your layout file, and bind your event listeners. If you're a jQuery user, think of it as the equivalent of the document.ready function.

    • onStart: the method called when the activity becomes visible to the user.

    • onResume: the method called when the activity is moved to the foreground of the visible space, when the user is able to not only see the activity but interact with it. After the onResume method is called, the activity is considered to be "running."

    • onPause: called when the activity is no longer in the foreground, usually as the result of another activity being started.

    • onStop: called when the activity is no longer visible to the user in either the foreground or background.

    • onRestart: called when the activity is being restarted (made visible again) after executing onStop but not onDestroy.

    • onDestroy: called just before an activity is destroyed/unloaded from memory.


  • Any activity that isn't currently "running" could potentially be removed from memory by the Android OS if available system memory is low. The more inactive an activity is, the better the chance of it being destroyed to reclaim memory, so an activity that is "stopped" is in more danger of being removed from memory than an activity that is "paused."

  • Because even an activity that is "paused" can be destroyed under extremely low memory conditions, it is a best practice to run code to store/save any persistent data within the activity within the onPause method just in case (kind of like how the auto-save function works in Microsoft Office to save your work every few minutes).

  • To preserve the current state of an activity (like filtered search results) rather than persistent data, you can use code in the onSaveInstanceState method to perserve that data in a Bundle object (which, like an intent, stores data in key/value pairs).  The onSaveInstanceState method in the activity is called by the Android OS itself as soon as the activity has the potential to be removed from memory. However, onSaveInstanceState is NOT called when the user explicitly takes action to destroy an activity (usually by exiting the entire application).

  • It is possible for one "application" to utilize activity objects from one or more different application packages (.apk files), given the proper planning and permissions.

Wednesday, May 5, 2010

Developing Native Android Applications: Not as Hard As You Might Think

Two months ago, my boss asked me to try and build a native Android application based on the mobile website I had created for the university's annual Maryland Day festival. Both he and I are part of an IT initiative in our department tasked with figuring out how best to provide IT services to smartphone users on campus, and while we have in-house expertise in iPhone development, none of us were familiar with what would be involved in building Android applications. So he asked me to give it a shot.

I started by going to the official Android developer site:  http://developer.android.com/index.html. I downloaded the Android SDK per the site instructions, then downloaded and installed the Eclipse plugins for doing Android development, and the files needed to work with the Android API I was targeting in my application. I went through the "Hello World" tutorial, where I learned the basics of starting an Android project in Eclipse, how to configure a simple layout, and how to run the device emulator. After going through a few more of the layout-oriented tutorials, I realized that I was missing out on a few of the concepts being discussed, so I stopped coding and started reading through the development guide pages on the site, where I learned about the different components you can use in Android applications, what they were used for, and how to use them.

After spending the first few weeks just learning from the documentation and the tutorials, I started to focus more of my attention on how to accomplish the tasks I needed to make my particular application work. The developer site didn't have examples that addressed some of the issues I needed to solve, so I starting searching the web. Sometimes I found exactly the answer I was looking for on an Android development forum. Other times, I was able to cobble together an approach based on answers to similar issues on all-purpose tech forums like StackOverflow. I was always able to find at least a clue, something that would point me to the right package in the API documentation. I also had to stray from the Android developer site anytime I needed to learn more about Java coding itself, as it's kind of assumed that the developer is confortable with Java programming (an incorrect assumption in my case).

By the time I was done, I had created a working Android application that:

  • Would check for updated event information at startup by making an HTTP call to an XML page. If the version number on the XML page was higher than the version number stored in the application's database, it would make an HTTP call to a ColdFusion page that output the updated event information as XML, parse the XML with a SAX parser, and update the application's SQLite database with the event data.

  • Provided the user with a number of different ways to find events by interest. Each listing (whether it was a list of events, a list of event sponsors, etc.) would be preceded by a search box, and as the user typed in the search box, the list would be filtered on-the-fly based on the search text.

  • Gave the user the ability to flag an event as a "favorite" by tapping a toggle button on the event detail page, which would update the event record in the SQLite table and allow them to pull up a list of all of their favorite events.

  • Gave the user the option of seeing a satellite map view of where the event was located using the Google Map API, with the event location marked with an particular icon based on what type of an event it was.

  • Gave the user the option of seeing a satellite map view that showed the user their current GPS location on campus and where the particular event was located.  The user's position on the map would be updated as the user made their way towards the event location.

Although it worked pretty well, there were a few minor bugs that I couldn't work out before the festival, and we weren't comfortable releasing it to the public having only been able to test it on particular Android phone model (the Motorola Droid), so it wasn't put into production.

Even though I went into the project with an open mind, I really hadn't expected to be able to build such a full-featured application, not as a first Android application and not with being a Java noob to boot. What made it possible was the excellent documentation on the Android developer site, the development tools within Eclipse (the code hinting/code correction, the automated compiler, the debugger perspective, and the device emulator), and the various tidbits of Android development how-tos out on the web. And thougth there were some moments of frustration, I generally enjoyed the experience.

I don't know how much more native Android development I'll be asked to do at my job, but I plan to create some Android apps on my own time now that I know how. And I plan to start blogging about Android development, not as an expert (I have a lot to learn yet) but as someone who's learning as he goes. So you can expect to see more Android and Android development content on my blog from here on out.

Saturday, January 30, 2010

HTML 5 Geolocation Functions and Mobile Web Browsers: Show the User Where They Are (Sort Of)

Every April, the University of Maryland holds a huge open-house event called Maryland Day that draws 60,000+ visitors to the campus to view exhibits highlighting the research conducted at the university and participate in various events and activities. All of the event details are entered into a ColdFusion application, and one of those details is the GPS coordinates (latitude and longitude) of where each event is taking place so visitors to the website can see where the events are located on Google Maps.

Now that smartphones are becoming more prevalent, I wanted to see if it was possible to build a web application that would show the user where they were currently located and then show them on a map how to get from their current location to a particular event.

So I did some research and learned that HTML 5 comes with a Geolocation API. This API allows you to execute Javascript functions within the navigator.geolocation object built into the browser that retrieve the supposed latitude and longitude coordinates of where the browser is located (and, if available, the altitude, heading, and speed at which the browser is moving).

Using the code examples I found on the Gelocation API page on the W3C website and on Oliver Wehren's geolocation demo page, I was able to create my own test page for determining my location and marking it on Google Maps. I then tried using the page with my Motorola Droid, my iPod Touch, and my manager's iPhone.

The default web browsers on all three devices implemented the Geolocation API (my preferred browser on my Droid, the Dolphin Browser, did not). Each of the browsers displayed a confirmation dialog asking for permission to share my location information with the web page (as mandated by the standard), and once I permitted the information to be used, my test page was able to place a marker denoting my location on the map.

However, the location wasn't as accurate as I had hoped. Although the API was coded to accept location data from the on-board GPS system in a mobile device, neither the iPhone nor the Droid seem to provide GPS data to the browser. If I was connected to the campus wireless network, my location was determined via the network topography, and it could be off by as much as 150 feet or so. The accuracy was even worse if I was relying solely on 3G: in that scenario, but the iPhone and the Droid had me located on the side of a state road on the outskirts of campus, a good twenty minute walk from where I actually was. I have no idea what caused both devices to pick that particular spot, as there certainly wasn't a cell tower anywhere near that location.

So I came to the conclusion that while the Geolocation API could be used to determine what town, city, or general area a user was currently in, it wasn't accurate enough (at least with these browsers in these devices) to provide walking or driving directions within a small area, especially given the fact that many of the users for the service I had in mind would only have access to the Internet via a 3G connection.

But if someone knows of a way of increasing the location accuracy of the Geolocation API, a way that doesn't require the end-user to modify their mobile browser in order to make it work, I'd love to hear about it.